Chapter 18 以 GUI 自動化來控制鍵盤和滑鼠]
- 沒有相應的程式庫時,可以模擬鍵盤、或滑鼠動作,直接操作 GUI 的得到相對的功能。
Task list: 😄
概述
GitHub (number of stars)(2018, April, 01)
- AutoHotkey (C++) - 1 652
- pyautogui - 1 630
- sikuli - 1 387
- autopy - 856
- TestStack.White (C#) - 797
- pywinauto - 773
StackOverflow (number of tagged questions)
- AutoHotkey - 2663 (73.3% answered)
- AutoIt - 1627 (64.1% answered)
- sikuli - 673 (53.6% answered)
- pywinauto - 329 (61.4% answered)
- pyautogui - 231 (36.4% answered)
- AutoHotkey: 是用自己的語法
- Python: 有 pyautogui,pywinauto,autopy(python2,較舊)
PyAutoGUI vs PyWinAuto Python PyAutoGUI和Pywinauto区别及安装
” 首先,这两者最大共同点就是可以操作计算机,模拟人工输入和鼠标操作等等。不过这两者也有侧重点,PyAutoGUI侧重于鼠标,键盘,截图,消息框的功能,Pywinauto侧重对CS的操作,虽然都有键盘,鼠标等模拟输入,不过最核心还是软件上的操作比较多。可以说各有所长。”
- 程式送出的鍵盤、滑鼠信號很快,不像手動的速度,所以記得留下檢查點
- 藉由登出來關閉所有程式,或
kill -9?
暫停與失效安全保護
pyautogui.PAUSE = 1.5暫停 1.5 秒- 把游標移出畫面, 會觸發 pyautogui 的異常,會暫停程式
- 關掉失效保護功能:
pyautogui.FAILSAFE = False
PyAutoGUI 文件
官方文件的大綱:
- 安裝、基本操作
- 滑鼠游標
- 鍵盤
- 訊息方塊
- 截圖
控制滑鼠移動
- 畫面左上為原點 (0,0) ,向右 X 軸 正,向下 Y 軸 正
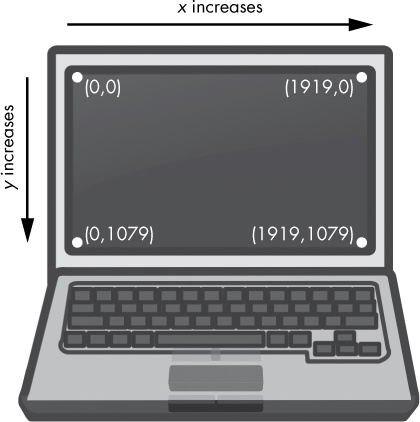
0,0       X increases -->
+---------------------------+
|                           | Y increases
|                           |     |
|   1920 x 1080 screen      |     |
|                           |     V
|                           |
|                           |
+---------------------------+ 1919, 1079
>>> import pyautogui
>>> pyautogui.size()
(1920, 1080)
>>> width, height = pyautogui.size()
取得滑鼠位置
>>> pyautogui.postion()
(311,32) # 傳回目前游標座標
移動滑鼠游標
pyautogui.moveTo(xpos,ypos,duration=xxsec):
duration是每次移動幾秒,直到到達目的座標
pyautogui.moveRel(xdis,ydis,duration=xxsec)- 相對座標移動
程式:目前的游標位置
import pyautogui
print('Press Ctrl-C to quit')

try:
    while True:
        x,y = pyautogui.position()
        positionStr = 'X: ' + str(x).rjust(4) + ' Y: ' + str(y).rjust(4)
        # str.rjust() 字串向右對齊
        print(positionStr,end='')
        print('\b'*len(positionStr), end='', flush=True)
        # 字串印出後,用等長的 Backspace 刪除,並 flush
except KeyboardInterrupt:
    print('\nDone.')
控制滑鼠游標的互動
Click
- Click : mosueDown, mouseUp
pyautogui.click(xpos,ypos,button='left') # right,middle,left
pyautogui.click(xpos,ypos)
pyautogui.mouseUp()
pyautogui.mouseDown()
pyautogui.doubleClick()
pyautogui.rightClick()
pyautogui.middleClick()
Drag and Drop
- Drag : mouseDown()(一般是左鍵) -> 移動游標
- Drop : (在 Drag狀態下)移動游標 -> mouseUp()
- pyautogui.dragTo(xpos,ypos) : 絕對座標
- pyautogui.dragRel(xpos,ypos): 相對座標
# spiralDraw.py
import pyautogui, time
time.sleep(5)   # 給緩衝時間
pyautogui.click() # get focus
distance = 200

while distance > 0:
    pyautogui.dragRel(distance, 0, duration = 0.2) # move right
    distance = distance -5
    pyautogui.dragRel(0,distance, duration = 0.2) # move down
    pyautogui.dragRel(-distance,0, duration = 0.2) # move left
    distance = distance -5
    pyautogui.dragRel(0, -distance, duration = 0.2) # move up
滑鼠游標的捲動
pyautogui.scroll(xdistance):- 傳入整數引數,向上(正數)、或向下(負數)捲動,這個單位在不同作業系統可能會不同,可能要先試看看。
>>> pyautogui.scroll(10)   # scroll up 10 "clicks"
>>> pyautogui.scroll(-10)  # scroll down 10 "clicks"
>>> pyautogui.scroll(10, x=100, y=100)  # 游標先移到 x, y 後,再移動 10 "步"
# pyperclip.py
import pyperclip # 傳資料到剪貼簿的工具
numbers = ''
for i in range(200):
numbers = numbers + str(i) + '\n'
pyperclip.copy(numbers)
# 開個 notepad ,把東西貼上去
import time, pyautogui
time.sleep(5); pyautogui.scroll(100)螢幕操作的函式
- 根據螢幕截圖的內容,分析後,再進行動作
- 需要 Pillow (Linux中需要 scrot 來截圖)
截圖
>>> import pyautogui
>>> im = pyautogui.screenshot()
# im 就是 Pillow 的 Image 物件
>>> im.getpixel((0,0))
# 傳回值是座標的 (R, G, B)
(176,176,175)
>>> im.getpixel((50,200))
(130,135,144)
分析截圖
- 之前程式在執行前,先 click() 取得 focus 前,可以先確定座標位置的顏色和預想的一樣,再執行。
pyautogui.pixelMatchsColor(xpos,ypos,(R,G,B))
程式:擴充 mouseNow 的功能
pass
影像圖片的識別
pyautogui.locateOnScreen(path2pic)找出小圖的位置在目前螢幕的某個位置- 傳回值是 左上的座標 (xpos,ypos,寬,高)
控制鍵盤
傳送一個字串
pyautogui.typewrite('string')
鍵盤按鍵名稱
- 一般字元 a-z,A-Z, 符號 …
- 控制字元,BACKSPACE, ENTER, DELETE…
- 功能鍵,F1-F12,Ctrl,Alt,Shift,winleft,command,option
SEE ALSO
按下,釋放按鍵
pyautogui.keyUp('shift'),pyautogui.keyDown('ctrl')pyautogui.press('a')= keyDown + keyUp
快速鍵組合
pyautogui.hotkey('ctrl','alt','shift','s')可以同時按下多鍵
整理 PyAutoGUI 的函式
- moveTo(x, y). Moves the mouse cursor to the given x and y coordinates.
- moveRel(xOffset, yOffset). Moves the mouse cursor relative to its current position.
- dragTo(x, y). Moves the mouse cursor while the left button is held down.
- dragRel(xOffset, yOffset). Moves the mouse cursor relative to its current position while the left button is held down.
- click(x, y, button). Simulates a click (left button by default).
- rightClick(). Simulates a right-button click.
- middleClick(). Simulates a middle-button click.
- doubleClick(). Simulates a double left-button click.
- mouseDown(x, y, button). Simulates pressing down the given button at the position x, y.
- mouseUp(x, y, button). Simulates releasing the given button at the position x, y.
- scroll(units). Simulates the scroll wheel. A positive argument scrolls up; a negative argument scrolls down.
- typewrite(message). Types the characters in the given message string.
- typewrite([key1, key2, key3]). Types the given keyboard key strings.
- press(key). Presses the given keyboard key string.
- keyDown(key). Simulates pressing down the given keyboard key.
- keyUp(key). Simulates releasing the given keyboard key.
- hotkey([key1, key2, key3]). Simulates pressing the given keyboard key strings down in order and then releasing them in reverse order.
- screenshot(). Returns a screenshot as an Image object. (See Chapter 17 for information on Image objects.)
程式:自動填寫表單
- 簡列需要的動作
- 詳列一下細步的動作,可用虛擬碼寫作
- 實作
總結
- 自動化可以節省不少時間,但是錯誤處理也很重要,可以確定程式走在正確的路徑上。
習題
- Q: 1. How can you trigger PyAutoGUI’s fail safe to stop a program?
- A: 把游標移出邊界。
pyautogui.FAILSAFE = True, 打開安全防護功能。 滑鼠在移出畫面邊界時,會自動停止,會觸發pyautogui.FailSageExcetion- Q: 2. What function returns the current resolution()?
- A:
pyautogui.size()傳回 寬、高 - Q: 3. What function returns the coordinates for the mouse cursor’s current position?
- A:
pyautogui.position(),x,y 座標 - Q: 4. What is the difference between pyautogui.moveTo() and pyautogui.moveRel()?
- A: 絕對座標,相對移動
- Q: 5. What functions can be used to drag the mouse?
- A:
pyautogui.dragTo(),pyautogui.dragRel() - Q: 6. What function call will type out the characters of “Hello world!”?
- A:
pyautogui.typewriter("Hellow World!") - Q: 7. How can you do keypresses for special keys such as the keyboard’s left arrow key?
- A:
pyautogui.press(left) - Q: 8. How can you save the current contents of the screen to an image file named screenshot.png?
- A:
im = pyaytogui.screenshot(screenshot.png) - Q: 9. What code would set a two second pause after every PyAutoGUI function call?
- A:
time.sleep(2) - 錯,是用
pyautogui.PAUSE= 2
實作
Looking Busy
防閒罝動作:
import pyautogui
import time

time.sleep(5)
print('Press Ctrl-C to quit')

distance = 4
timespan = 1
try:
    while True:
        pyautogui.moveRel(distance,0, duration = timespan)
        time.sleep(5)
        pyautogui.moveRel(-distance,0, duration = timespan)
except KeyboardInterrupt:
    print('\nDone.')
Instant Messenger Bot
pass
Game-Playing Bot Tutorial
pass